After seeing the wind turbine blades at the rest stop, I contacted Skypower to get the specifications on the blades we saw. Grace sent me some great links - so if you are interested in renewable energy, like B, you might want to check these additional resources out. Good info!!!Enjoy!
http://www.gepower.com/prod_serv/products/wind_turbines/en/downloads/ge_15_brochure.pdf
http://www.vestas.com/en/about-vestas.aspx
http://www.powergeneration.siemens.com/products-solutions-services/products-packages/wind-turbines/products/swt-3-6-107/techspecification/techspecification.htm
http://www.enercon.de/en/_home.htm
Monday, April 27, 2009


Saturday, April 25, 2009
And the Move Begins
From 2pm until dark, the move was on!!! Thankfully, I have a big truck, so I could take a lot over on each trip. I think I ended up making 8 trips in 7 hrs. Needless to say, progress was made!
before
 after
after
 Yes, a giant wall of legos. You would believe how empty my living room seems!

before
 after
after Yes, a giant wall of legos. You would believe how empty my living room seems!
Friday, April 24, 2009
Well Rounded Education
Our day began with core curriculum, then we added music credit, and finally got some international community service exposure. Pretty well rounding day, if you ask the teacher.
Tonight we went to see Three Men and a Tenor. B had seen them before, but this was my first experience. WOW! I know, not a very sophisticated adjective, but these men were so impressive. Both of us strongly recommend, if you ever have a chance to see them – it is so worth it. Not only can they sing, but they are funny and just a really nice performance to watch. The international/world community service comes in with the reason for the concert. The Rotary Clubs have, for more than 20 years, worked to eradicate polio in all countries. The concert tonight was the Washtenaw County Rotary Clubs’ fundraising effort to support the International Rotary Clubs commitment to this far reaching eradication project. The US Rotary Clubs have committed to raising $200 million in a 4 yr span (2008-12), and events like this will help them do just that. Tonight’s event was also important because during a certain time frame, the Gates Foundation has committed to matching $2.50 for every dollar the Rotary raises. So our dollars were well matched!
Tonight we went to see Three Men and a Tenor. B had seen them before, but this was my first experience. WOW! I know, not a very sophisticated adjective, but these men were so impressive. Both of us strongly recommend, if you ever have a chance to see them – it is so worth it. Not only can they sing, but they are funny and just a really nice performance to watch.
 The international/world community service comes in with the reason for the concert. The Rotary Clubs have, for more than 20 years, worked to eradicate polio in all countries. The concert tonight was the Washtenaw County Rotary Clubs’ fundraising effort to support the International Rotary Clubs commitment to this far reaching eradication project. The US Rotary Clubs have committed to raising $200 million in a 4 yr span (2008-12), and events like this will help them do just that. Tonight’s event was also important because during a certain time frame, the Gates Foundation has committed to matching $2.50 for every dollar the Rotary raises. So our dollars were well matched!
Thursday, April 23, 2009
Horsing Around - with a colt
After community service today, B and his riding instructor went to another barn to see a new colt. The colt is 6 days old. He is a standard breed, race horse trotter. Charming, to say the least. B's words, "He's a little spit-fire."
 B letting the mare and colt get use to him.
 Finally, B figures he can reach out......
 .....and the colt nibbles back.
 Tonight's burning questions, "Mom, will you buy me a horse?" Mom's answer is still the same, "Not happening." He is pretty cute, how to say no?????

 B letting the mare and colt get use to him.
 Finally, B figures he can reach out...........and the colt nibbles back.
 Tonight's burning questions, "Mom, will you buy me a horse?" Mom's answer is still the same, "Not happening." He is pretty cute, how to say no?????
Wednesday, April 22, 2009
What Lurks in the Night? (at a rest stop)
You never know what you are going to drive by when traveling home, late at night, from an art class?! LOL This was good enough that we got off the freeway (we were going W on 94), got back on going back east, got off again and came back west and pulled into the rest stop where we had seen 2 of these strange things!!! Never seen before, and probably never will again.
This is what we saw from the freeway at, um, 70 miles per hour (ha ha).
 This is the treat we got to experience up close! And please know, this picture does NOT do the sight justice. It was simply awesome. The whole truck and trailer took up the width of 6 1/2 semi-truck parking spaces. B used the best adjective - massive!
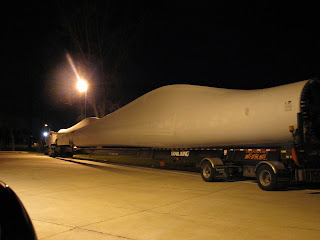 This is what we figured out after we dug around the internet this morning. These are blades for a wind turbine. Skypower, a Canadian company, is a leader in the renewable energy industry. They are involved with both wind and solar projects.
If you are at all interested in renewable energy, you've got to dig around their website. http://www.skypower.com Many cool things await you, like videos, bios on current projects, general information on wind and solar power, etc. There is even an Educational Center on their website! http://www.skypower.com/Education_center.html
The timing of seeing these could not have been better, given it was Earth Day! B has not stopped talking about renewable energy. And he is back on wanting to erect a household wind turbine at the lake. Sometimes you just never know where and when you are going to find a lesson just waiting to be discovered!
This is what we saw from the freeway at, um, 70 miles per hour (ha ha).
 This is the treat we got to experience up close! And please know, this picture does NOT do the sight justice. It was simply awesome. The whole truck and trailer took up the width of 6 1/2 semi-truck parking spaces. B used the best adjective - massive!
 This is what we figured out after we dug around the internet this morning. These are blades for a wind turbine. Skypower, a Canadian company, is a leader in the renewable energy industry. They are involved with both wind and solar projects.
If you are at all interested in renewable energy, you've got to dig around their website. http://www.skypower.com Many cool things await you, like videos, bios on current projects, general information on wind and solar power, etc. There is even an Educational Center on their website! http://www.skypower.com/Education_center.html
The timing of seeing these could not have been better, given it was Earth Day! B has not stopped talking about renewable energy. And he is back on wanting to erect a household wind turbine at the lake. Sometimes you just never know where and when you are going to find a lesson just waiting to be discovered!
Blowing Neon - project - pt. 2
Since this is an art, there are is a certain 'learning curve' when it comes to getting the technique down. Most of that is done on scrap pieces of glass tubing, until you get the hang of it. Along one side of the shop there are metal trash cans, and B use to save all his pieces until I would pick him up. We both love the sound of the glass breaking apart when it is tossed into the cans. Needless to say, B threw his fair share of pieces away. Even Bob the instructor has been caught throwing tubing away. In any event, several pieces made it home - B has made me a few very cool designs and I have the word "mom" written in glass tubing too. BUT tonight, we brought his first piece home that actually had electrodes attached and was hooked to a transformer. B has worked on this piece for weeks (unfortunately I do not have any pictures of the paper design and template process). I have seen the pieces come together one by one (more on that in a minute), but tonight is the first I have seen all the pieces together and lit. I know I am bias, but I think it's a pretty amazing piece and wait until you read what he is going to do with it.
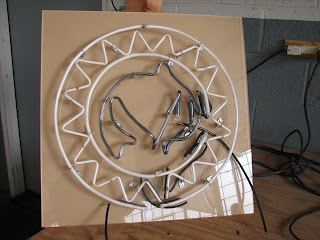
Here is what it looks like when there is no electricity running from the outlet, through a transformer, into the electrodes and through the tubing. Cool, but nothing too exciting right?
 Here's what it looks like lit up!!
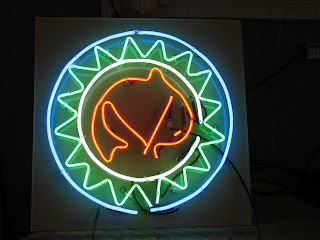 This is mounted on a 24x24 inch piece of 1/4" thick plexiglass. Each color is a seperate piece of neon with electrodes on each end, which are then all wired together into the transformer. So B had to make the blue outside circle and go through the whole process in the previous post. Then he made the white circle, then moved onto the green zig zags, and lastly did the red fish. Took some time, and there was definitely some glass crashing into the trash bins each week. And there were a few snags along the way. A big one was on his zig zag piece there was an arcing problem and it blew a hole in the tubing at the bend before the electrode. When that happens you learn how to repair the tubing. Thankfully, Bob is a patient man!
Here is what it looks like when there is no electricity running from the outlet, through a transformer, into the electrodes and through the tubing. Cool, but nothing too exciting right?
 Here's what it looks like lit up!!
 This is mounted on a 24x24 inch piece of 1/4" thick plexiglass. Each color is a seperate piece of neon with electrodes on each end, which are then all wired together into the transformer. So B had to make the blue outside circle and go through the whole process in the previous post. Then he made the white circle, then moved onto the green zig zags, and lastly did the red fish. Took some time, and there was definitely some glass crashing into the trash bins each week. And there were a few snags along the way. A big one was on his zig zag piece there was an arcing problem and it blew a hole in the tubing at the bend before the electrode. When that happens you learn how to repair the tubing. Thankfully, Bob is a patient man!
Anyway......it was pretty amazing when he turned this on for me to see. Now, what is he going to do with it??? His first neon project, goes to....................................his boss at work. Can you even believe????!!!!! This is the logo on for The Fish Doctor, which is the tropical fish store where B works. He is taking the sign in this next Monday. I can't even imagine the reaction.
Blowing Neon - shop/process - pt. 1
B has been taking classes at the Glass Academy in neon blowing at The Furance for 10 wks now. He got interested in learning how to blow neon when we came to the holiday open house/demonstration back in December. I finally remembered tonight to take the camera. This post has to do with all the general neon blowing information and pictures. The part 2 post has to do with his first neon project, which we brought home completed tonight (more on that in the next post). Enjoy!!
This is the actual shop at The Furance. The Furance offers glass blowing in an glory hole, lampworking, stain glass classes, and slumping or fusing classes, plus the neon shop.
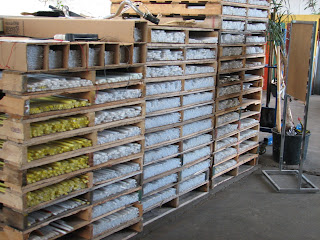
 This is how the glass tubing is shipped and stored at the shop. They all look pretty much the same, but as you will see in a minute - they aren't! The glass tubes come in different mm sizes, colors and types (depending if you are going to pump neon or argon in them).
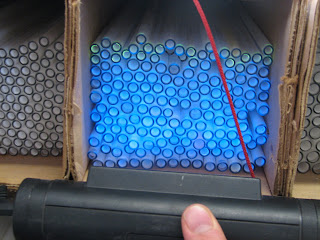
 THIS, is how you tell what color you are picking. THIS, is also one of B's favorite parts. Who wouldn't love to get to play with a black light? When you illuminate the ends of the tubes with a black light, you can tell what color the tubing will be once the 'filling process' is done and the electricity is hooked to your piece of work.
 It's important to pick the right color now, because you don't know for sure until the end of the project - and if you spend all the time bending, blowing, filling and then plug it in and find your UofM letters are in green - well you have to start again :-)
 ribbon torch
 cross fire torch
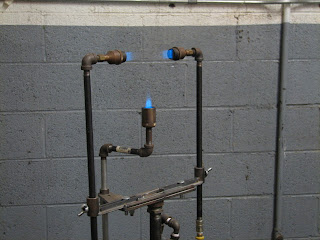 heating the electrode
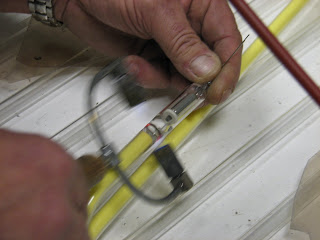
 butt welding the electrode into place, which seals the tube
 Unfortunately a step is missing here - which is the actual heating, bending and blowing of the tubes. Which is really the 'art' part of this technique. We might get those pics another day and I can update. sorry
This is the actual shop at The Furance. The Furance offers glass blowing in an glory hole, lampworking, stain glass classes, and slumping or fusing classes, plus the neon shop.
 This is how the glass tubing is shipped and stored at the shop. They all look pretty much the same, but as you will see in a minute - they aren't! The glass tubes come in different mm sizes, colors and types (depending if you are going to pump neon or argon in them).
 THIS, is how you tell what color you are picking. THIS, is also one of B's favorite parts. Who wouldn't love to get to play with a black light? When you illuminate the ends of the tubes with a black light, you can tell what color the tubing will be once the 'filling process' is done and the electricity is hooked to your piece of work.
 It's important to pick the right color now, because you don't know for sure until the end of the project - and if you spend all the time bending, blowing, filling and then plug it in and find your UofM letters are in green - well you have to start again :-)
 ribbon torch
 cross fire torch
 heating the electrode
 butt welding the electrode into place, which seals the tube
 Unfortunately a step is missing here - which is the actual heating, bending and blowing of the tubes. Which is really the 'art' part of this technique. We might get those pics another day and I can update. sorry
electrode being attached with a hand torch
 pumping station, where either the neon or argon is pumped into the sealed piece
 gadgets and gadges galore!!!
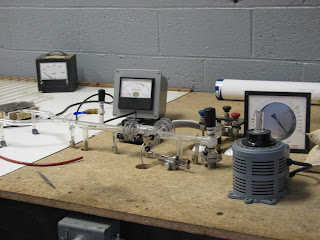 Piece hooked to the station, just about ready to be pumped. This piece is completely sealed and has been butt welded to the station (that is actually what Bob is doing in this pic). This is where a lot of science comes in. All of which B understands, but I am left clueless.
 A drop of mercury is added to a small bubble (which is blown into the tubing before it is hooked to the pumping station. This mercury is eventually "dropped" and "walked" around in the piece (more on that in a bit).
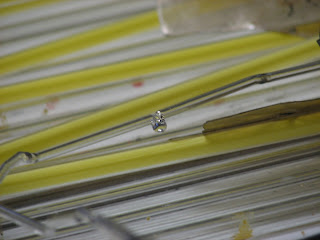 Then when everything is hooked up, and each bend is protected with mica between the glass tubing (so the electricity can not arc between the bends), then the piece is heated and pumped with the gas.
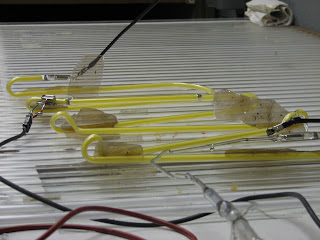 Once the piece has cooled, after being pumped, it is taken off the pumping station. Then that drop of mercury is 'dropped,' which means it is shaken out of the bubble and the mercury is 'walked' around the piece - which means you turn the piece in your hands until the mercury has been totally dispersed inside the entire piece of art. Then the piece is hooked to a transformer via the electrodes. When electricty is first sent through the tubing it is white, but as it heats up.......................
 ....your piece takes on the color, hopefully, that you wanted and chose at the beginning.
 The art part and the science part are a little more complicated than I have depicted here, but you get the idea. And I am sure I have missed some important details. But it is late and this teacher/mom has had it for the brainwork side of things.
 pumping station, where either the neon or argon is pumped into the sealed piece
 gadgets and gadges galore!!!
 Piece hooked to the station, just about ready to be pumped. This piece is completely sealed and has been butt welded to the station (that is actually what Bob is doing in this pic). This is where a lot of science comes in. All of which B understands, but I am left clueless.
 A drop of mercury is added to a small bubble (which is blown into the tubing before it is hooked to the pumping station. This mercury is eventually "dropped" and "walked" around in the piece (more on that in a bit).
 Then when everything is hooked up, and each bend is protected with mica between the glass tubing (so the electricity can not arc between the bends), then the piece is heated and pumped with the gas.
 Once the piece has cooled, after being pumped, it is taken off the pumping station. Then that drop of mercury is 'dropped,' which means it is shaken out of the bubble and the mercury is 'walked' around the piece - which means you turn the piece in your hands until the mercury has been totally dispersed inside the entire piece of art. Then the piece is hooked to a transformer via the electrodes. When electricty is first sent through the tubing it is white, but as it heats up.......................
 ....your piece takes on the color, hopefully, that you wanted and chose at the beginning.
 The art part and the science part are a little more complicated than I have depicted here, but you get the idea. And I am sure I have missed some important details. But it is late and this teacher/mom has had it for the brainwork side of things.
Subscribe to:
Posts (Atom)